跳至主要内容

iOS集成H5微信支付实现跳转与回调的解决方案

 原文链接

前言

最近有个需求,不能在iOS客户端内集成支付宝和微信的App支付SDK(为了防苹果审核检测SDK),因此使用H5支付,虽然微信和支付宝的H5支付文档都说不要在App内使用H5支付而是使用App支付,但办法总是有的。

这篇讲的是H5微信支付如何从App跳转微信以及如何从微信跳转回App,支付宝的见这篇:

iOS集成支付宝H5支付实现跳转与回调的解决方案

实现的效果是:App→微信→支付(成功失败或取消)→App

前置准备

本项目使用WKWebView,前置动作是后端小伙伴已经处理好微信H5支付下单链接,客户端接收到下单链接后的操作。

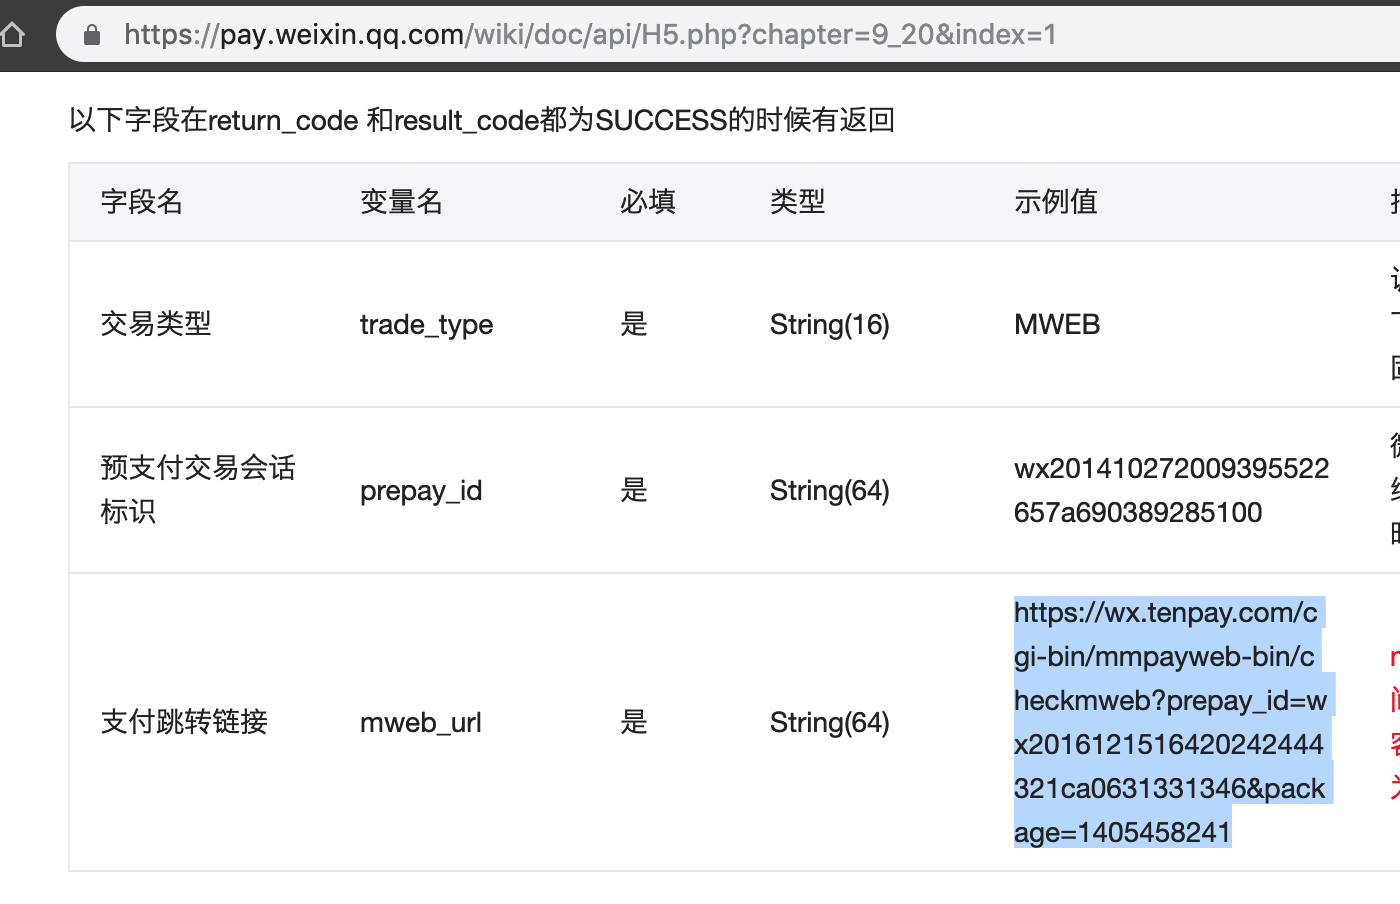
下单链接即为微信支付文档-统一下单API中返回的 mweb_url,格式为 https://wx.tenpay.com/cgi-bin/mmpayweb-bin/checkmweb?prepay_id=wx2016121516420242444321ca0631331346&package=1405458241

操作步骤

1. 添加 URL Scheme 并把微信加入白名单

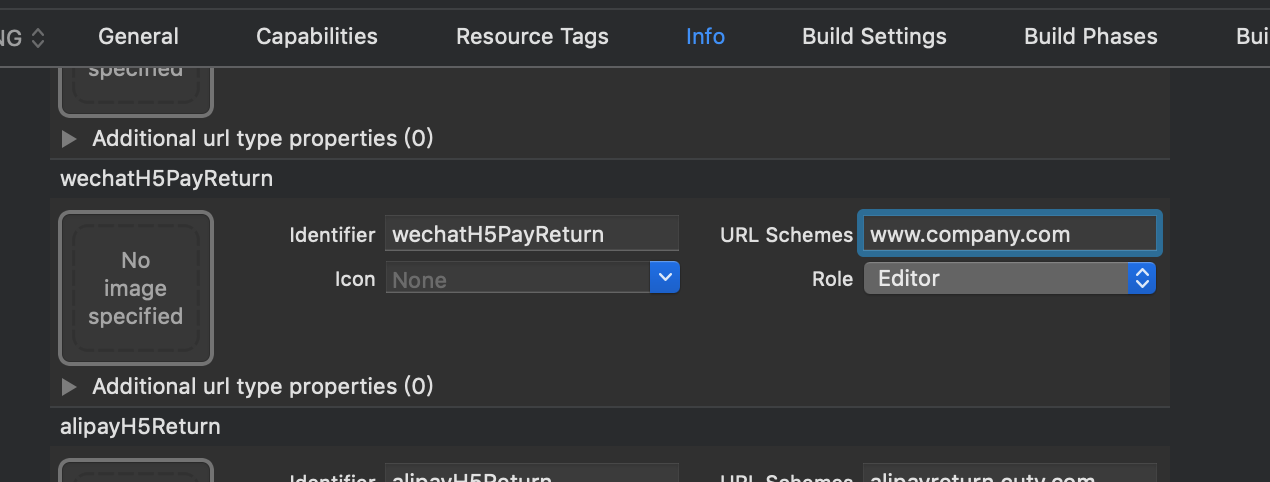
添加 URL Scheme。在 xcodeproj 文件 Info 选项卡最下面的 URL Types内设置。 注意此URL的一级域名需要与微信商户后台(微信商户平台-产品中心-开发配置-H5支付)设置的的一级域名一致,比如微信商户里设置的是company.com,那 URL Schemes 可以设为 a1.company.com,此特性使得一套H5支付可以方便得集成到多个App。只有一个App需要H5支付的话也可以直接填与微信后台的一致的 company.com 。

2019年4月10日更新
如果像上图那样填的是 www.company.com,那 URL Scheme 只能设为其三级域名如 a2.www.company.com 或同样的 www.company.com

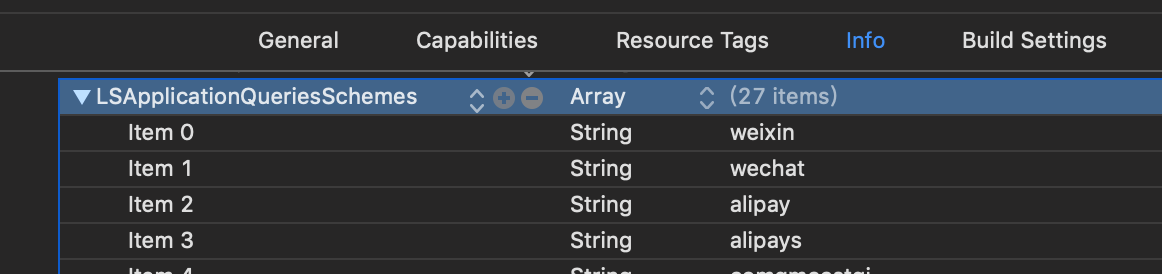
把微信的 URL Scheme weixin 和 wechat 填入项目的白名单。在 xcodeproj 文件 Info 选项卡内的 Custom iOS Target Properties 的 LSApplicationQueriesSchemes 里添加上述两个字符串,若没有 LSApplicationQueriesSchemes 就手动输入添加,类型为数组 Array。

2. WKWebView加载链接

添加协议 WKNavigationDelegateWKUIDelegate

创建一个WKWebView,并加载统一下单链接。

1
2
3
4
5
6
7
8
9
10
- (void)buildWKWebView {
WKWebView *webView = [[WKWebView alloc] initWithFrame:CGRectMake(0, NAV_HEIGHT, SCREEN_WIDTH, SCREEN_HEIGHT - NAV_HEIGHT)];
[self.view addSubview:webView];
webView.navigationDelegate = self;
webView.UIDelegate = self;
NSURL *payURL = [NSURL URLWithString:self.payString];
NSMutableURLRequest *request = [NSMutableURLRequest requestWithURL:payURL];
[request setValue:@"a1.company.com://wxpaycallback/" forHTTPHeaderField:@"Referer"];
[webView loadRequest:request];
}

此处self.payString就是后台传来的微信H5支付统一下单链接,格式为 https://wx.tenpay.com/cgi-bin/mmpayweb-bin/checkmweb?prepay_id=wx2016121516420242444321ca0631331346&package=1405458041

我们需要做的处理是根据文档给这个请求添加请求头 Referer,关键在于这个 a1.company.com://wxpaycallback/ 既满足了微信检测到有商户后台设置好的一级域名,同时把这个链接做成了 URL Scheme 使得可以在跳转微信客户端后(不管支付成功还是失败)能顺利跳转回自己的App。其中的 host wxpaycallback/ 可以任意设置,方便在 AppDelegate 里处理跳转回来后部署业务逻辑。当然如果你不需要在 AppDelegate 里接收动作而是直接跳回支付界面自行后续处理的话就只用设为前一步在 URL Scheme a1.company.com:// 即可。

2019.4.10 更新

经过测试,对于App内的H5支付而言,实际上是下面步骤里
@"https://wx.tenpay.com/cgi-bin/mmpayweb-bin/checkmweb"
后接的参数 redirect_url 对支付后跳回App起作用,Referer只起到给微信校验的作用。

所以 Referer 只需要设置成微信H5支付登记的域名的子域名即可,如
[request setValue:@"a1.company.com" forHTTPHeaderField:@"Referer"];

3. 实现代理方法拦截链接并跳转微信

1
2
3
4
5
6
7
8
9
10
11
12
13
14
15
16
17
18
19
20
21
22
23
24
25
26
27
28
29
30
31
32
33
34
35
36
37
38
- (void)webView:(WKWebView *)webView decidePolicyForNavigationAction:(WKNavigationAction *)navigationAction decisionHandler:(void (^)(WKNavigationActionPolicy))decisionHandler {

NSURLRequest *request = navigationAction.request;
NSString *absoluteString = [navigationAction.request.URL.absoluteString stringByRemovingPercentEncoding];

// 拦截WKWebView加载的微信支付统一下单链接, 将redirect_url参数修改为唤起自己App的URLScheme
if ([absoluteString hasPrefix:@"https://wx.tenpay.com/cgi-bin/mmpayweb-bin/checkmweb"] && ![absoluteString hasSuffix:[NSString stringWithFormat:@"redirect_url=a1.company.com://wxpaycallback/"]]) {
decisionHandler(WKNavigationActionPolicyCancel);
NSString *redirectUrl = nil;
if ([absoluteString containsString:@"redirect_url="]) {
NSRange redirectRange = [absoluteString rangeOfString:@"redirect_url"];
redirectUrl = [[absoluteString substringToIndex:redirectRange.location] stringByAppendingString:[NSString stringWithFormat:@"redirect_url=a1.company.com://wxpaycallback/"]];
} else {
redirectUrl = [absoluteString stringByAppendingString:[NSString stringWithFormat:@"redirect_url=a1.company.com://wxpaycallback/"]];
}
NSMutableURLRequest *newRequest = [NSMutableURLRequest requestWithURL:[NSURL URLWithString:redirectUrl] cachePolicy:NSURLRequestUseProtocolCachePolicy timeoutInterval:30];
newRequest.allHTTPHeaderFields = request.allHTTPHeaderFields;
newRequest.URL = [NSURL URLWithString:redirectUrl];
[webView loadRequest:newRequest];
return;
}

//拦截重定向的跳转微信的 URL Scheme, 打开微信
if ([absoluteString hasPrefix:@"weixin://"]) {
decisionHandler(WKNavigationActionPolicyAllow);
dispatch_after(dispatch_time(DISPATCH_TIME_NOW, (int64_t)(0.5 * NSEC_PER_SEC)), dispatch_get_main_queue(), ^{
if ([[UIApplication sharedApplication] canOpenURL:navigationAction.request.URL]) {
[[UIApplication sharedApplication] openURL:navigationAction.request.URL];
} else {
//未安装微信, 自行处理
}
});
return;
}

decisionHandler(WKNavigationActionPolicyAllow);
return;
}

4. AppDelegate 中接收跳转动作

当然你也不一定需要在AppDelegate里接收返回动作,也可以直接返回支付界面,自行操作后续逻辑。

以下是AppDelegate接收返回动作的示例。

1
2
3
4
5
6
7
8
9
10
11
12
13
14
15
- (BOOL)application:(UIApplication *)app openURL:(NSURL *)url options:(NSDictionary<NSString *,id> *)options{
//safepay是支付宝H5支付的回调host
if ([url.host isEqualToString:@"wxpaycallback"] || [url.host isEqualToString:@"safepay"]) {
// 自行操作业务逻辑,比如使用通知请求查询订单状态,popView回上级页面等
UITabBarController *tabBarVC = (UITabBarController *)topRootViewController;
UINavigationController *navVC = tabBarVC.viewControllers[tabBarVC.selectedIndex];
[navVC popViewControllerAnimated:YES];

NSString *orderId = [[NSUserDefaults standardUserDefaults] objectForKey:@"PayOrderId"];
NSString *payFee = [[NSUserDefaults standardUserDefaults] objectForKey:@"PayFee"];
//以及更多参数
NSDictionary *resultDict = @{@"order_id":orderId, @"payFee":payFee};
[[NSNotificationCenter defaultCenter] postNotificationName:@"htmlPaymentNotification" object:self userInfo:resultDict];
}
}

5. 关于微信H5支付域名设置

2019年4月10日更新

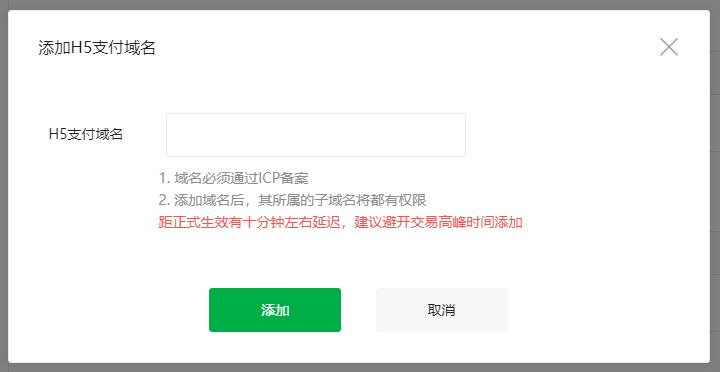
这里额外提一下,截止到2019年4月,微信支付设置页面明确说了

添加域名后,其所属的子域名将都有权限

也就是说只需要填一个一级域名比如 company.com ,就可以有无限多个二级域名可供不同App使用,绕过微信H5支付只能添加5个域名的限制。如果填的是二级域名比如 www.company.com,那么只能往下使用三级域名比如 a1.www.company.com

以微信H5支付域名填了 company.com 为例,那可以这样操作

AppAlphaBeta-A1Beta-A2Gamma
添加的Refereralpha.company.coma1.beta.company.coma2.beta.company.comgamma.company.com
要替换的redirect_urlalpha.company.com://optionala1.beta.company.com://a2.beta.company.com://optionalgamma.company.com://
URL Schemealpha.company.coma1.beta.company.coma2.beta.company.comgamma.company.com

参考博客链接

评论

此博客中的热门博文

Resolving errSecInternalComponent errors during code signing

原文链接 One code signing issue I commonly see, both here on DevForums and in my Day Job™ with DTS, is that the codesign command fails with errSecInternalComponent. This issue crops up in a wide variety of circumstances and the correct fix depends on the specific problem. This post is my attempt to clarify the potential causes of this error and help folks resolve it. If you have any questions or comments about this, please start a new thread, tagging it with Code Signing so that I see it. Share and Enjoy — Quinn “The Eskimo!” @ Developer Technical Support @ Apple let myEmail = "eskimo" + "1" + "@" + "apple.com" Resolving errSecInternalComponent errors during code signing In some circumstances the codesign command might fail with the error errSecInternalComponent. For example: % codesign -s "Apple Development" "MyTrue" MyTrue: errSecInternalComponent This typically affects folks who are signing code in a nonstandard environm...

iOS:检测使用VPN或Proxy

参考链接: https://www.jianshu.com/p/c3b950dbf86a https://gist.github.com/PramodJoshi/4faad4c91f7dcb4eb9b06be8390c01db http://noodlecode.net/2018/04/check-if-ios-app-is-connected-to-vpn 第一种方法 需要导入框架CFNetwork 然后,这个方法是mrc的:需要添加-fno-objc-arc的flag 代码如下: + ( BOOL )getProxyStatus { NSDictionary *proxySettings = NSMakeCollectable ([( NSDictionary *) CFNetworkCopySystemProxySettings () autorelease]); NSArray *proxies = NSMakeCollectable ([( NSArray *) CFNetworkCopyProxiesForURL (( CFURLRef )[ NSURL URLWithString: @"http://www.google.com" ], ( CFDictionaryRef )proxySettings) autorelease]); NSDictionary *settings = [proxies objectAtIndex: 0 ]; NSLog ( @"host=%@" , [settings objectForKey:( NSString *)kCFProxyHostNameKey]); NSLog ( @"port=%@" , [settings objectForKey:( NSString *)kCFProxyPortNumberKey]); NSLog ( @"type=%@" , [settings objectForKey:( NSString *)kCFProxyTypeKey]); if ([[settings object...

去广告DNS设置,国内ADGuard DNS方案,手机电脑iOS去广告,保护隐私

 原文链接 之前分享过使用mac系统搭建adguard home,这几个月用下来零零散散基本上也被弃用了。主要原因是因为需要保持电脑一直开机。但是我的电脑是笔记本,存在移动各个地域的情况,也就是说只能够屏蔽电脑自身,对于手机而言不太现实。今天偶然发现dnspod推出了高级版的公共解析。dnspod背靠腾讯云,肯定是合法合规的公共解析服务,这个高级版用起来不错。 国内自己搭建解析服务是违法行为,所以这也是为什么使用dnspod的原因。 后台截图 开始使用 首先我们先进入dnspod的公共解析页面,点击开始使用。 专业版公共解析 dnspod会提供几种预设,我们选择「开发者」即可 开发者 然后你就成功的申请到自己个人使用的dns了! 更新拦截规则 我们可以将常见的广告过滤规则加入到dns中。我们在顶部选项卡中选择「拦截规则」。 拦截规则设置 打开adguard adguard 绑定iOS设备 推荐使用描述文件的方式,删除配置时删除描述文件即可。 描述文件 绑定macOS 推荐使用描述文件的方式,删除配置时删除描述文件即可。 描述文件 mac需要在「系统偏好设置」的「网络」中查看是否正在运行。 代理 如果没有运行需要点击「···」来启动服务。 启动服务 绑定路由器 找到自己路由器的DHCP设置,修改dns,然后记得绑定自己的ip。 修改dns 绑定ip 费用 目前有300万次/月的免费额度,但没有超出之后的价格。300万次一个人比较难用完,可以放心使用。 我个人使用iOS设备两台、智能家居、电脑两台,日均请求数大致2万/日。 判断是否搭建成功 可以通过查看日志的方式,日志大概有半小时到一小时的延迟,请耐心等待。