跳至主要内容

Gerrit资料


Gerrit使用总结


I believe the answer provided by atlassian says to change the name of the remote branch when you see the Push dialog.

  1. Open the push dialog
  2. Click on the remote branch name under the "Remote Branch" column (mine is presently 'master')
  3. Type in the new remo branch name - which would be 'refs/for/master' for me
  4. Click OK.

This appears to have properly pushed the commits into Gerrit for me. The problem I have now is that the 'refs/for/master' value doesn't persist. Now to figure that out. I will update this post once I've figured that out. Hope this helps even tho it's late to the game.

Update: it turns out that you need to add a push entry under remote origin in the .git/config. You should do this via the git config command (tho i did edit the file manually i'm sure that's bad practice). the push line i wrote is:

push = refs/heads/*:refs/for/*

for clarity here is my remote origin entry in .git/config:

[remote "origin"]
    url = ssh://gerrit-test.example.com:29418/mystuff.git
    fetch = +refs/heads/*:refs/remotes/origin/*
    push = refs/heads/*:refs/for/*

In SourceTree you can now push and it will push to gerrit instead of the final repo. ( you can now also just do git push without specifying anything else and it will push to gerrit ). Note that after a push, SourceTree will still show a number on the Push button that says you still have stuff to push. This is because it is still fetching from the master repo and the changes you've pushed into gerrit have not yet been merged into the master repo. Once your changes have been merged into the master repo the number on the Push button will disappear.


sourceTree配合gerrit

主要问题在于无法直接在sourceTree左上角push,我们需要在终端操作,而且不能使用 
git push origin master
 

这是为什么呢?看过【Gerrit】Gerrit工作流程及使用手册这篇文章的就会知道,gerrit增加了codereview的流程。所以会依赖一个临时分支,我们提交代码需要提交到该临时分支。

所以,使用以下命令拉取代码:

git push origin HEAD:refs/for/master
 但是!有些同学就是喜欢用sourceTree,漂亮又强大,突然不能push代码,非常慌!
为了解决这个问题,网上看了很多帖子,其中Stack Overflow上的这篇帖子答案最标准: https://stackoverflow.com/questions/9917645/push-to-gerrit-using-sourcetree
但是,实践证明第一种方案不可用。就是
git config remote.origin.push refs/heads/*:refs/for/*

修改config文件,无效!

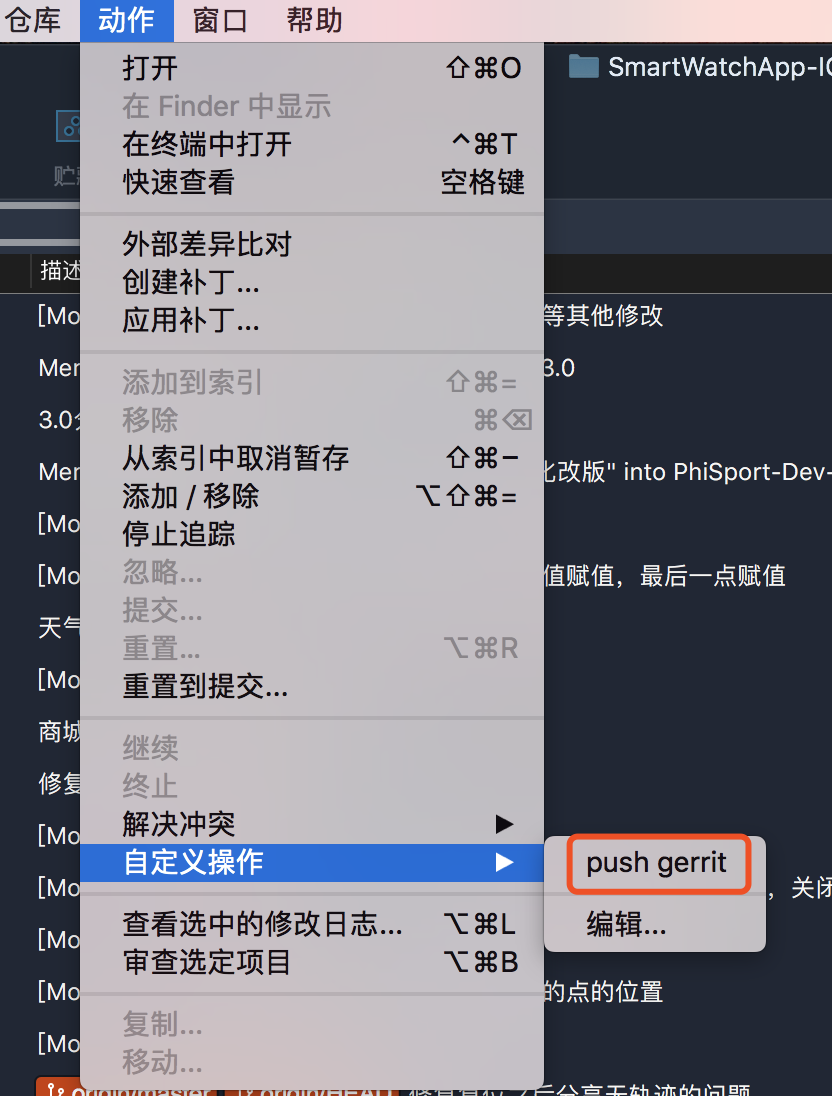
第二种是创建一个自定义操作,执行脚本,脚本去正确push。事实证明好用!

1 使用xcode创建一个shell脚本,内容如下

#!/bin/sh

#  push.sh
#  KeepRunning
#
#  Created by 王涛 on 2018/4/27.
#  Copyright © 2018年 niujinfeng. All rights reserved.

# 获取当前分支名
branch=`git symbolic-ref --short -q HEAD`
# push review
git push origin HEAD:refs/for/${branch}


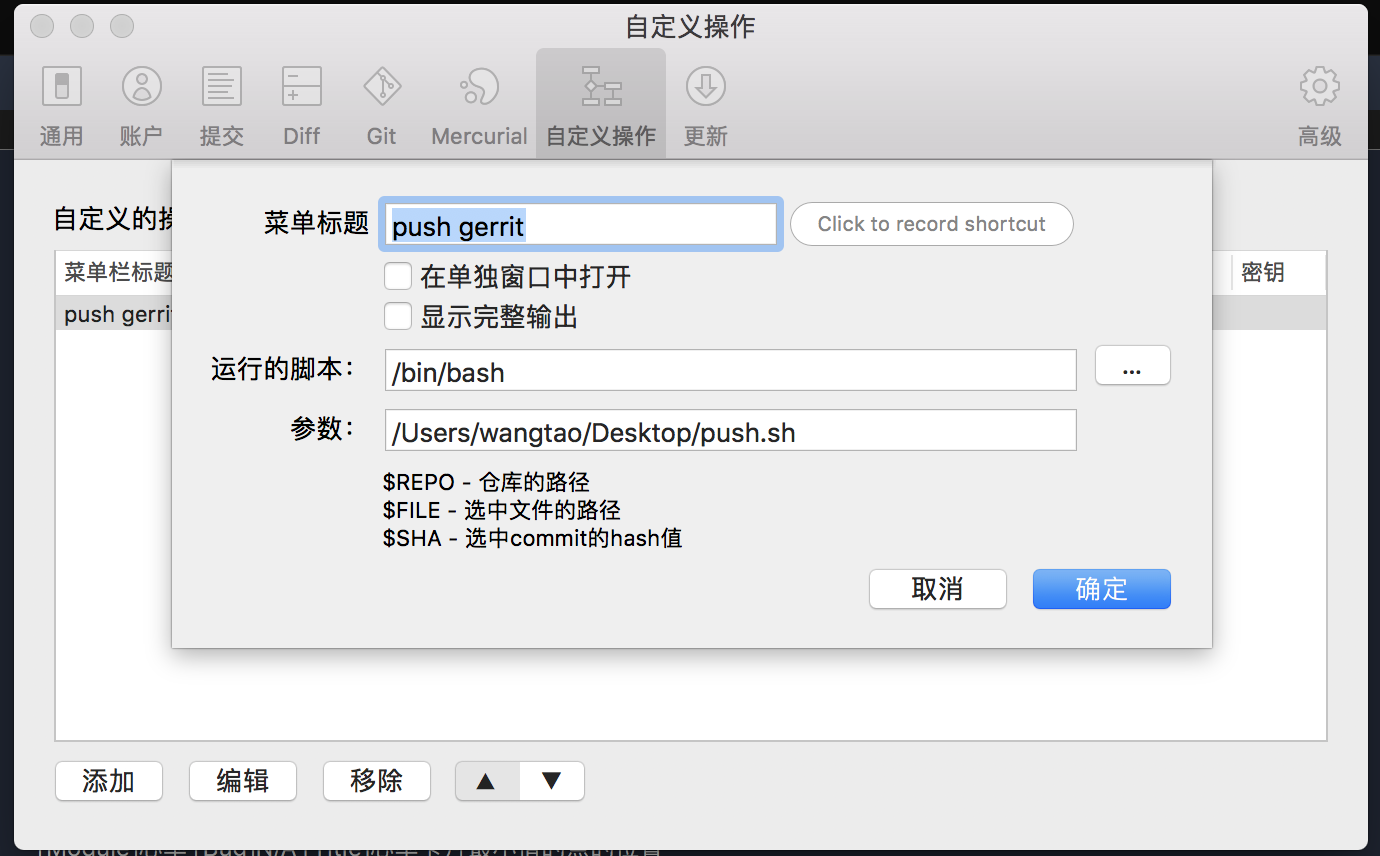
2 在sourceTree创建一个自定义操作,配置如下,参数一栏是脚本所在路径,请替换正确路径

3 然后push的时候不要去选择右上角push,而是选择自定义操作push gerrit。
 
 完美解决,现在可以丢开终端了。
 
三、冲突解决
 
因为gerrit默认没有merger权限,所以当冲突之后,就算本地解决了,上传的时候还是会提示错误。怎么办呢?这时候把分支reset到最近一次没有冲突的节点,将自己的改动stash,暂存。然后拉最新代码,这时候不会冲突,因为你的工作区是干净的,然后应用stash,这时候就算冲突,你本地解决一下就可以提交了。冲突解决有很多方式,这是我最常用的,大家需要多练习。

评论

此博客中的热门博文

Resolving errSecInternalComponent errors during code signing

原文链接 One code signing issue I commonly see, both here on DevForums and in my Day Job™ with DTS, is that the codesign command fails with errSecInternalComponent. This issue crops up in a wide variety of circumstances and the correct fix depends on the specific problem. This post is my attempt to clarify the potential causes of this error and help folks resolve it. If you have any questions or comments about this, please start a new thread, tagging it with Code Signing so that I see it. Share and Enjoy — Quinn “The Eskimo!” @ Developer Technical Support @ Apple let myEmail = "eskimo" + "1" + "@" + "apple.com" Resolving errSecInternalComponent errors during code signing In some circumstances the codesign command might fail with the error errSecInternalComponent. For example: % codesign -s "Apple Development" "MyTrue" MyTrue: errSecInternalComponent This typically affects folks who are signing code in a nonstandard environm...

iOS:检测使用VPN或Proxy

参考链接: https://www.jianshu.com/p/c3b950dbf86a https://gist.github.com/PramodJoshi/4faad4c91f7dcb4eb9b06be8390c01db http://noodlecode.net/2018/04/check-if-ios-app-is-connected-to-vpn 第一种方法 需要导入框架CFNetwork 然后,这个方法是mrc的:需要添加-fno-objc-arc的flag 代码如下: + ( BOOL )getProxyStatus { NSDictionary *proxySettings = NSMakeCollectable ([( NSDictionary *) CFNetworkCopySystemProxySettings () autorelease]); NSArray *proxies = NSMakeCollectable ([( NSArray *) CFNetworkCopyProxiesForURL (( CFURLRef )[ NSURL URLWithString: @"http://www.google.com" ], ( CFDictionaryRef )proxySettings) autorelease]); NSDictionary *settings = [proxies objectAtIndex: 0 ]; NSLog ( @"host=%@" , [settings objectForKey:( NSString *)kCFProxyHostNameKey]); NSLog ( @"port=%@" , [settings objectForKey:( NSString *)kCFProxyPortNumberKey]); NSLog ( @"type=%@" , [settings objectForKey:( NSString *)kCFProxyTypeKey]); if ([[settings object...

去广告DNS设置,国内ADGuard DNS方案,手机电脑iOS去广告,保护隐私

 原文链接 之前分享过使用mac系统搭建adguard home,这几个月用下来零零散散基本上也被弃用了。主要原因是因为需要保持电脑一直开机。但是我的电脑是笔记本,存在移动各个地域的情况,也就是说只能够屏蔽电脑自身,对于手机而言不太现实。今天偶然发现dnspod推出了高级版的公共解析。dnspod背靠腾讯云,肯定是合法合规的公共解析服务,这个高级版用起来不错。 国内自己搭建解析服务是违法行为,所以这也是为什么使用dnspod的原因。 后台截图 开始使用 首先我们先进入dnspod的公共解析页面,点击开始使用。 专业版公共解析 dnspod会提供几种预设,我们选择「开发者」即可 开发者 然后你就成功的申请到自己个人使用的dns了! 更新拦截规则 我们可以将常见的广告过滤规则加入到dns中。我们在顶部选项卡中选择「拦截规则」。 拦截规则设置 打开adguard adguard 绑定iOS设备 推荐使用描述文件的方式,删除配置时删除描述文件即可。 描述文件 绑定macOS 推荐使用描述文件的方式,删除配置时删除描述文件即可。 描述文件 mac需要在「系统偏好设置」的「网络」中查看是否正在运行。 代理 如果没有运行需要点击「···」来启动服务。 启动服务 绑定路由器 找到自己路由器的DHCP设置,修改dns,然后记得绑定自己的ip。 修改dns 绑定ip 费用 目前有300万次/月的免费额度,但没有超出之后的价格。300万次一个人比较难用完,可以放心使用。 我个人使用iOS设备两台、智能家居、电脑两台,日均请求数大致2万/日。 判断是否搭建成功 可以通过查看日志的方式,日志大概有半小时到一小时的延迟,请耐心等待。