跳至主要内容

The common raised center button problems in UITabBar

原文链接
参考链接: https://stackoverflow.com/questions/30527738/how-do-we-create-a-bigger-center-uitabbar-item

Ever had to do an app with that magnificent center button that’s sticking gorgeously out of the TabBar? Then I bet you know that it’s not as simple as throwing that piece in the TabBarController as a subview. It may be working at first, but it’ll stab you in the back the first chance it gets.
Let’s take a look at this example:

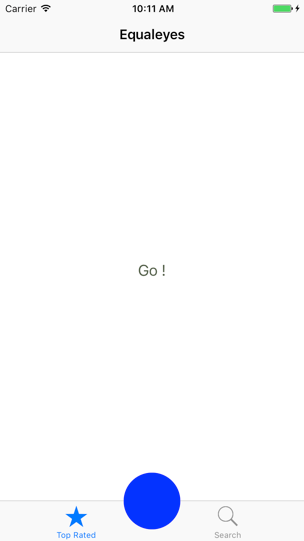
We have a TabBar with two normal items and one knob item in the middle.
We’ll use a simple UITabBarController.
First things first, let’s create two UITabBarItem-s and move them out of the way. Let’s shift them for about 15pt.
guard let tabItems = tabBar.items else { return }
tabItems[0].titlePositionAdjustment = UIOffset(horizontal: -15, vertical: 0)
tabItems[1].titlePositionAdjustment = UIOffset(horizontal: 15, vertical: 0)
This can be done either in the UITabBarController or the UITabBar subclass. I did it in the UITabBarController.
Next, where should we put that knob in? Here are the most common approaches I’ve seen so far:

The ‘UITabBarController, your view should have this’ approach

The most common (and easiest) way is to simply throw that knob into the view of the UITabBarController’s subclass.
middleButton.frame.size = CGSize(width: 70, height: 70)
middleButton.backgroundColor = .blue
middleButton.layer.cornerRadius = 35
middleButton.layer.masksToBounds = true
middleButton.center = CGPoint(x: UIScreen.main.bounds.width / 2, y:
UIScreen.main.bounds.height - 40)
view.addSubview(middleButton)
While this seems pretty straightforward and actually works (at least at first) – brace yourself, troubles are coming.

‘Your mom is calling’ trouble:
The first problem is the In-Call status bar, which is basically the status bar expanding its height and consequentially moving the UITabBarController’s view down and thus moving the middle button with it:
Video Player
00:00
00:08
The same happens with other status bar changes, such as Background recording and Background location usage (Google Maps).
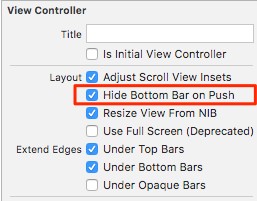
‘Let’s hide you in the next screen’ trouble:
While one of the UITabBarController’s main features is that it is visible on multiple screens, you may want to hide it from time to time while pushing another view controller. Let’s see what happens if we check the “Hides bottom bar when pushed” property on the pushed view controller:

And the result:
Video Player
00:00
00:05
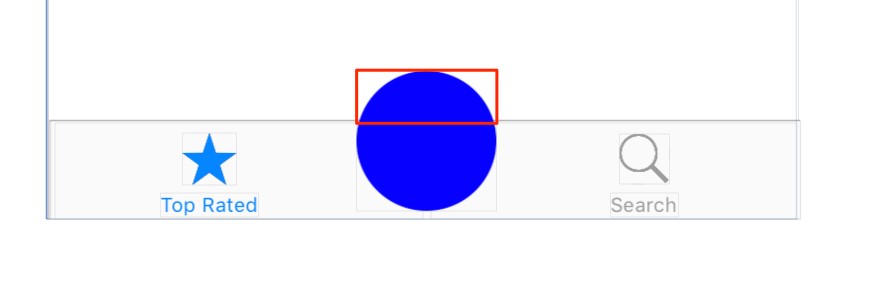
Welp, the button doesn’t want to go away! The reason for this is because the middle button is rendered to the UITabBarController’s UILayoutContainerView,which is shared with the UINavigationController.

To bypass this issue, check out the next approach.

The ‘UITabBar, you should take this’ approach

A better way is to add the centered button to the TabBar:
middleButton.center = CGPoint(x: tabBar.frame.width / 2, y: 10)
tabBar.addSubview(middleButton)
view rawUITabBar.swift hosted with ❤ by GitHub
This fixes the In-Call and hiding issues mentioned earlier, but leads to another issue – because the knob is bigger than the bounds of the TabBar, the overlapping part of the button isn’t tappable.

Now what? Don’t give up. There’s still hope.
Making the unclickable knob clickable again
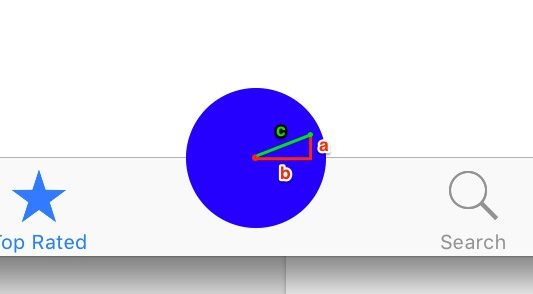
Since the TabBar handles taps only inside its bounds, we’ll need to help him out a bit. For that we need to subclass the UITabBar directly. This will allow us to override the TabBar hitTest method. With that we can manually specify which views are tapped on a certain given point.
How can we know whether or not the certain given point is inside the knob? By simply calculating the distance of the point from the center of the knob – simple Pythagorean theorem. If the distance is less than the radius, the point is inside.

The final code in the hitTest then looks like:
override func hitTest(_ point: CGPoint, with event: UIEvent?) -> UIView? {
let from = point
let to = middleButton.center
return sqrt((from.x - to.x) * (from.x - to.x) + (from.y - to.y) * (from.y - to.y)) <= 35 ? middleButton : super.hitTest(point, with: event)
}
view rawUITabBar.Swift hosted with ❤ by GitHub
If the point is inside the button, return the reference to the button, otherwise, ask the super to check for any other views – the UITabBarItems for example.
The result:
Video Player
00:00
00:06
The whole project for download can be found on GitHub here.

评论

此博客中的热门博文

Resolving errSecInternalComponent errors during code signing

原文链接 One code signing issue I commonly see, both here on DevForums and in my Day Job™ with DTS, is that the codesign command fails with errSecInternalComponent. This issue crops up in a wide variety of circumstances and the correct fix depends on the specific problem. This post is my attempt to clarify the potential causes of this error and help folks resolve it. If you have any questions or comments about this, please start a new thread, tagging it with Code Signing so that I see it. Share and Enjoy — Quinn “The Eskimo!” @ Developer Technical Support @ Apple let myEmail = "eskimo" + "1" + "@" + "apple.com" Resolving errSecInternalComponent errors during code signing In some circumstances the codesign command might fail with the error errSecInternalComponent. For example: % codesign -s "Apple Development" "MyTrue" MyTrue: errSecInternalComponent This typically affects folks who are signing code in a nonstandard environm...

iOS:检测使用VPN或Proxy

参考链接: https://www.jianshu.com/p/c3b950dbf86a https://gist.github.com/PramodJoshi/4faad4c91f7dcb4eb9b06be8390c01db http://noodlecode.net/2018/04/check-if-ios-app-is-connected-to-vpn 第一种方法 需要导入框架CFNetwork 然后,这个方法是mrc的:需要添加-fno-objc-arc的flag 代码如下: + ( BOOL )getProxyStatus { NSDictionary *proxySettings = NSMakeCollectable ([( NSDictionary *) CFNetworkCopySystemProxySettings () autorelease]); NSArray *proxies = NSMakeCollectable ([( NSArray *) CFNetworkCopyProxiesForURL (( CFURLRef )[ NSURL URLWithString: @"http://www.google.com" ], ( CFDictionaryRef )proxySettings) autorelease]); NSDictionary *settings = [proxies objectAtIndex: 0 ]; NSLog ( @"host=%@" , [settings objectForKey:( NSString *)kCFProxyHostNameKey]); NSLog ( @"port=%@" , [settings objectForKey:( NSString *)kCFProxyPortNumberKey]); NSLog ( @"type=%@" , [settings objectForKey:( NSString *)kCFProxyTypeKey]); if ([[settings object...

去广告DNS设置,国内ADGuard DNS方案,手机电脑iOS去广告,保护隐私

 原文链接 之前分享过使用mac系统搭建adguard home,这几个月用下来零零散散基本上也被弃用了。主要原因是因为需要保持电脑一直开机。但是我的电脑是笔记本,存在移动各个地域的情况,也就是说只能够屏蔽电脑自身,对于手机而言不太现实。今天偶然发现dnspod推出了高级版的公共解析。dnspod背靠腾讯云,肯定是合法合规的公共解析服务,这个高级版用起来不错。 国内自己搭建解析服务是违法行为,所以这也是为什么使用dnspod的原因。 后台截图 开始使用 首先我们先进入dnspod的公共解析页面,点击开始使用。 专业版公共解析 dnspod会提供几种预设,我们选择「开发者」即可 开发者 然后你就成功的申请到自己个人使用的dns了! 更新拦截规则 我们可以将常见的广告过滤规则加入到dns中。我们在顶部选项卡中选择「拦截规则」。 拦截规则设置 打开adguard adguard 绑定iOS设备 推荐使用描述文件的方式,删除配置时删除描述文件即可。 描述文件 绑定macOS 推荐使用描述文件的方式,删除配置时删除描述文件即可。 描述文件 mac需要在「系统偏好设置」的「网络」中查看是否正在运行。 代理 如果没有运行需要点击「···」来启动服务。 启动服务 绑定路由器 找到自己路由器的DHCP设置,修改dns,然后记得绑定自己的ip。 修改dns 绑定ip 费用 目前有300万次/月的免费额度,但没有超出之后的价格。300万次一个人比较难用完,可以放心使用。 我个人使用iOS设备两台、智能家居、电脑两台,日均请求数大致2万/日。 判断是否搭建成功 可以通过查看日志的方式,日志大概有半小时到一小时的延迟,请耐心等待。